


15 shortcut keys and touchpad operation of Win10
Even though it is not mandatory and necessary to learn the shortcut keys while using a computer, but it can save time while increasing working efficiency.
Martin Wilson
Jul 06, 2022
Protects your data from being accessed by others' devices if someone steals it using an Apple security feature called Activation Lock on iPhones, iPads, and iPod touches. A device's former owner can intentionally rehome it, which makes it very difficult to track. Although it's excellent theft protection, things can get complicated.
Apple would store the serial number of a device in a company database, along with its Apple ID, if Find My were enabled as a security measure. Despite a clean restoration, the device will continue to register and find out if Apple has enabled the feature in its database and its serial number. Apple may be able to bypass this procedure even if the proof is in your hands. It belongs to you with absolute certainty. You will often be turned away because they cannot assist you.
The previous owner's Apple ID does not need to be deleted permanently since the same situation has happened to many others. It is possible to remove Apple ID effortlessly by using several techniques. In today's article, you will learn methods for removing old Apple ID records from company databases or" How to remove a previous owner's Apple ID from a used iPhone, iPad, or iPad iTouch?". Based on the IS serial number, the device appears to have the feature enabled no matter how clean the restore is among Apple's databases.
The company often fires you with no explanation. In addition to creating an Apple device ID when adding a device, you can also do this in the App Store on any iOS device or Mac by tapping "Password forgotten" or "I don't have an ID.". The Apple ID will be created online and on Windows PCs, making it accessible on any device you own.
You will need an Apple ID for your iOS devices or Mac to work correctly. A new phone can use your Card with SIM functionality to make calls. To be removed from your iOS account, you will need to contact someone who previously owned the device to be removed from your Apple account. Activation lock screens or iCloud login screens allow users to enter their passwords.
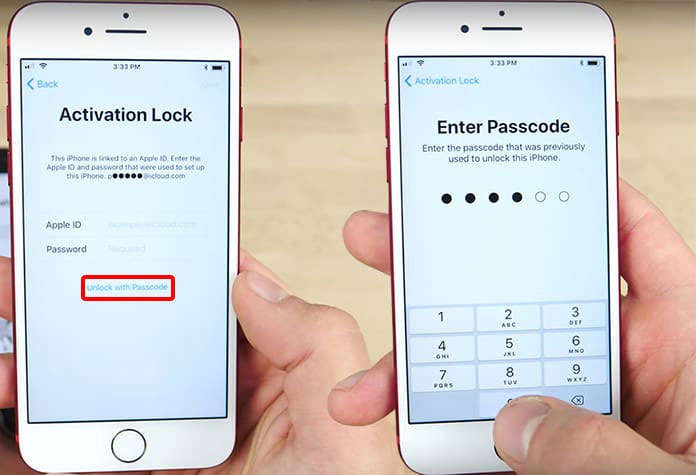
Restarting the system is necessary after the prior owner removes the system sent it. You will no longer be able to make calls, send messages, access cellular data, or log in to iCloud after removing the iOS activation lock. Immediately after removing the iCloud lock from your device, do not factory reset or flash the firmware, or it will re-lock. It is possible to reactivate the unlocking process.
You may have obtained a robbed machine and have the stolen item if you cannot contact the prior owner or if you cannot contact the person who sold you the item. To begin the Locked Activation consent appeal, you should be able to provide documentation that your old owner had the device legal until he sold it to you.
Those who want to give away old devices should remember these tips: If you want to sidestep this difficulty, you should ensure that the earlier owner has removed the device from their iTunes account before you complete the purchase.
When you purchase a second-hand iOS device from someone other than Apple, then you have no warranty. The device can only be used once unlinked from its former account holder's account. As a result, this device will not likely get activated without it.
15 shortcut keys and touchpad operation of Win10
Even though it is not mandatory and necessary to learn the shortcut keys while using a computer, but it can save time while increasing working efficiency.
A Brief Overview: Paint Matching Apps For iPhone
You will need paint to redecorate or repaint your home. You know roughly what shade you want to use, but you can't quite put your finger on its name. It's a reddish blue colour, but you already know that won't get you very far in a store.
Ways to Change the Default Behavior for New Tabs
On Android, the internet browser set as the default might be Google Chrome, Samsung's Internet browser, or another browser, such as the stock Android browser often seen in earlier devices.
Best iPhone Quiz Apps
If you are the kind of person who likes to answer questions aloud while watching game shows or is the one who usually starts up the trivia game at the bar, you can get your quiz fixed at any time.
Privacy Policy | Terms of Use
Copyright © 2021.All rights Reserved.
Contact us at : [email protected]


