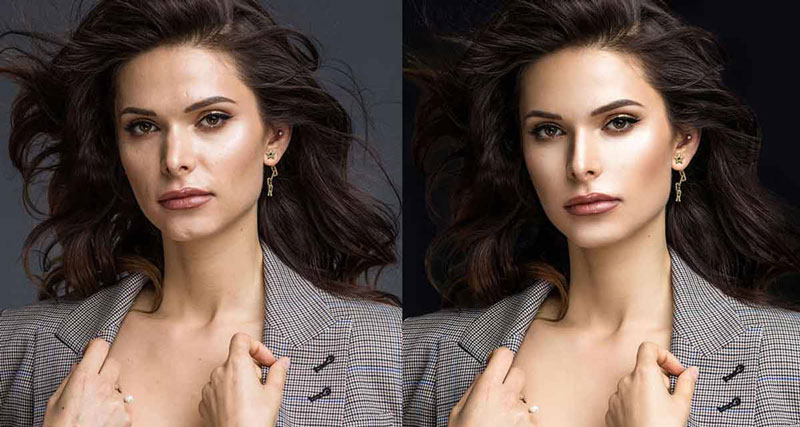
Nothing wrong with a bit of self-importance. When it comes to portraits, it's not uncommon for little flaws, such as a blemish or stray hair, to detract from an otherwise excellent image. Even if your camera's sensor is a bit filthy, you may have recorded an object in your photo that you wish you hadn't. Because of this, the Retouch tool is accessible in Photos for OS X. Retouching in Photos is more potent than retouching in iPhoto.
How To Utilize The Retouching Tool
After selecting a region of your photo and clicking or dragging over it, the Retouch tool will copy pixels from that area and mix them. Select a picture in Photos, hit Return to enter Edit mode, or press the Edit button in the toolbar to the top. To view what you're going to delete, use the Zoom slider in the upper-left corner of the screen.
If required, hold down the spacebar while dragging to realign the picture. You may activate the Retouch tool by clicking or hitting the R key. When you do this, your pointer changes to a black circle with a white border, allowing you to see the circle no matter whether your image is dark or light.
It's best to make the brush cursor slightly larger than the object you wish to eliminate before applying the adjustment. To make the cursor smaller or larger, you may either use the Size slider to the right or the keys on your keyboard.
Copy Pixels From The Cursor's Edge
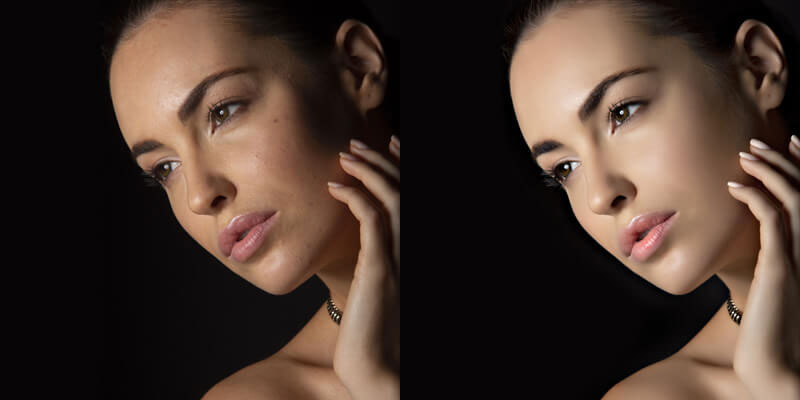
Click on the area you wish to remove if it is surrounded by many clean pixels, such as clear skies or blemish-free skin. A white overlay indicates where you clicked for a limited period, and then Photos integrates the copied pixels into the surrounding ones when you release the mouse button. A single click is all it takes to zap an object that fits comfortably within your cursor's reach.
In situations where the item has a lot of available pixels surrounding it, yet the circular brush cursor doesn't fit, use the tool to click and drag instead. The brushstrokes appear as a white overlay when you do this. Release the mouse button, and Photos copies and blends in surrounding pixels, making the area you've just drawn look more like the rest of the photo.
If you see any smudge in your photos, it is probably due to the pixel-blending that is taking place in Photos. If you need to reverse a brushstroke, hit Command-Z and try again, maybe with a smaller brush, by relocating the object within the brush cursor or clicking rather than dragging.
Use The Photo's Other Pixels To Make A Copy
If there aren't enough suitable pixels surrounding the object you wish to delete, you can use a sample point to copy pixels from another part of the image. This is a great way to get rid of things that are too near to the things you wish to keep. A + sign appears in place of your cursor when you Option-click the region where you wish to copy the pixels, as seen in the example below.
Afterward, let go of the Option key and use your mouse to click or drag over the troublesome region. At the same time, a plus sign indicates the region from which Photos is copying pixels, and a white overlay indicates where you have painted. Color and texture matching may need to set many sample points, depending on the region's size, to be corrected.
Before letting go of the mouse button, I drew two rows of brush strokes above the dog dish. Two further rows of brush strokes were added to the bowl by setting a new sample point below.
Color Adjustment Tool
Using Selective Color, you may alter the color of only a portion of your image. To modify the color of an area in your photo, use the eyedropper tool and color from the color well to save your changes.
Noise Reduction Tool
Photographs shot in poor light can have a grainy or speckled quality known as noise. Click or drag the slider to eliminate noise in your images when using the noise reduction tool.
The Vignette Adjustment Feature
Adding a vignette to your photograph, especially in portraiture, helps emphasize the center of your image by darkening the edges. It's possible to vary the color of your vignette's opacity by adjusting Strength, Radius, and Softness.
Enhance Your Images Using Adjustment Tools.
Your images won't need to be uploaded or edited using another program when you use Photos on a Mac because the editing process is completely integrated. At first sight, Photos may appear unimpressive, yet it has many options on par with those found in other popular photo editors.


